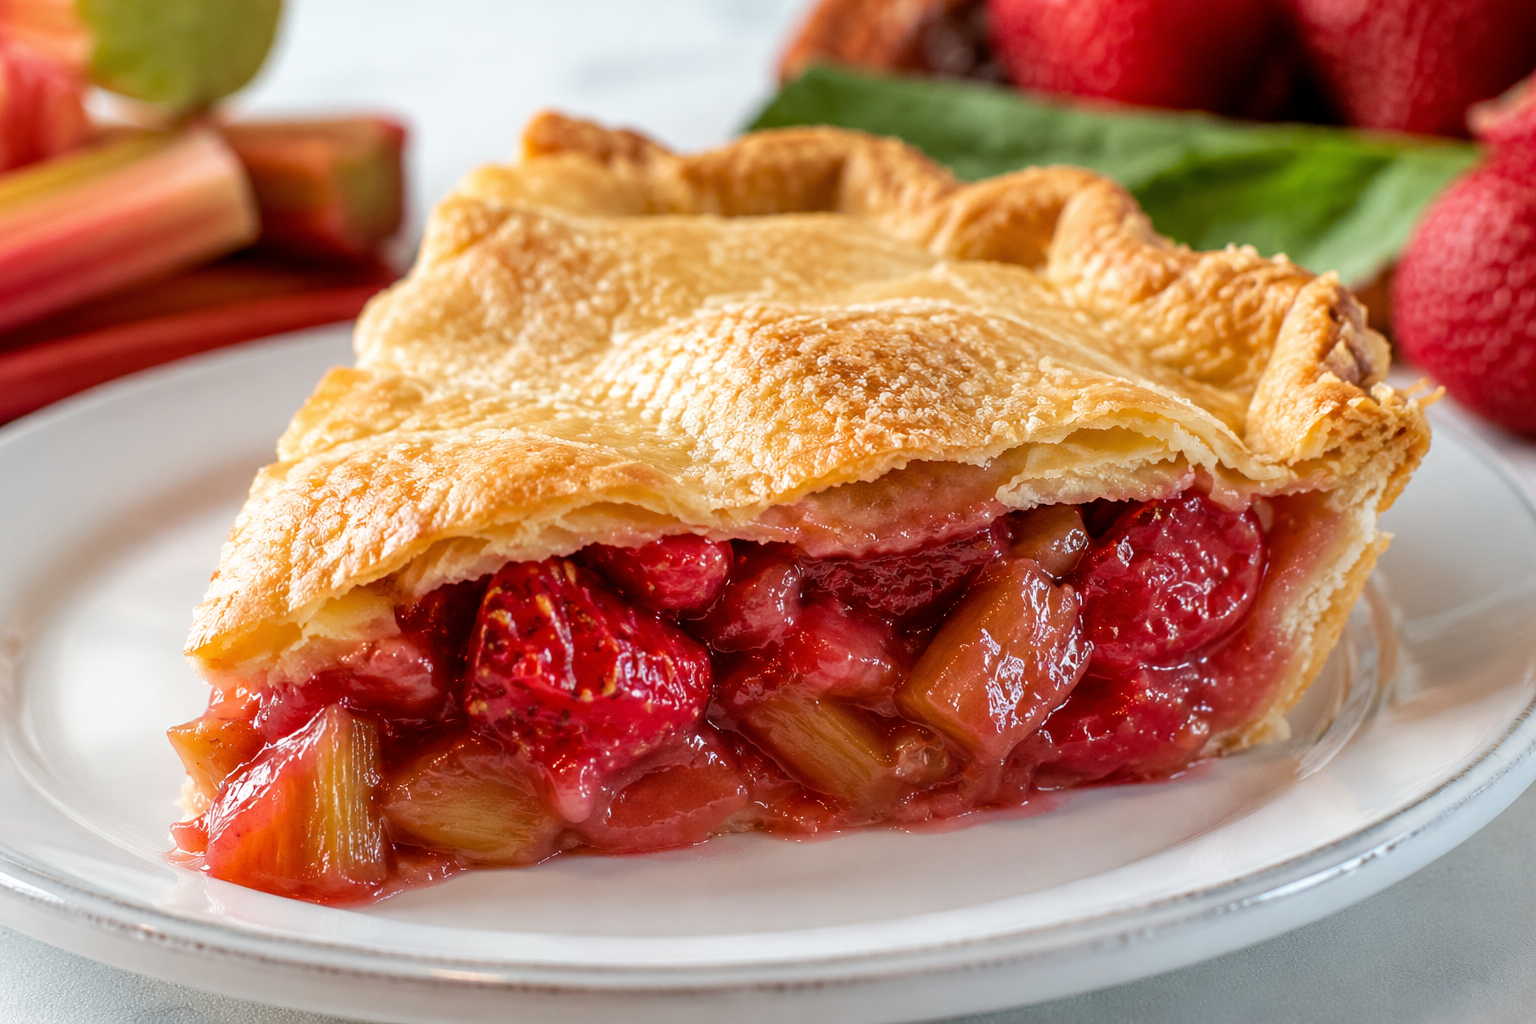
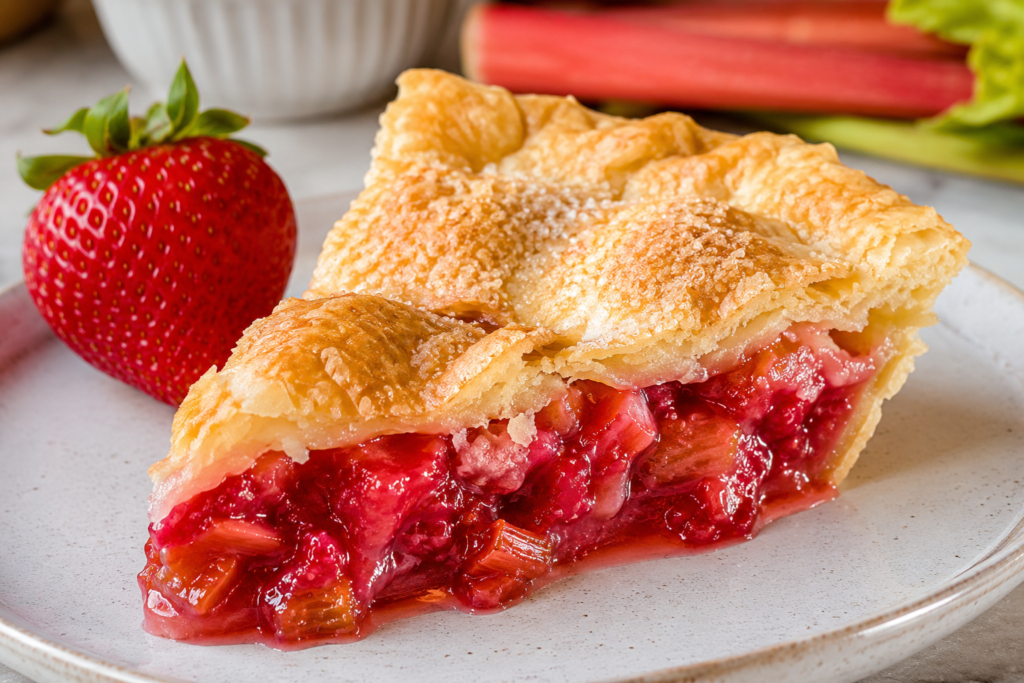
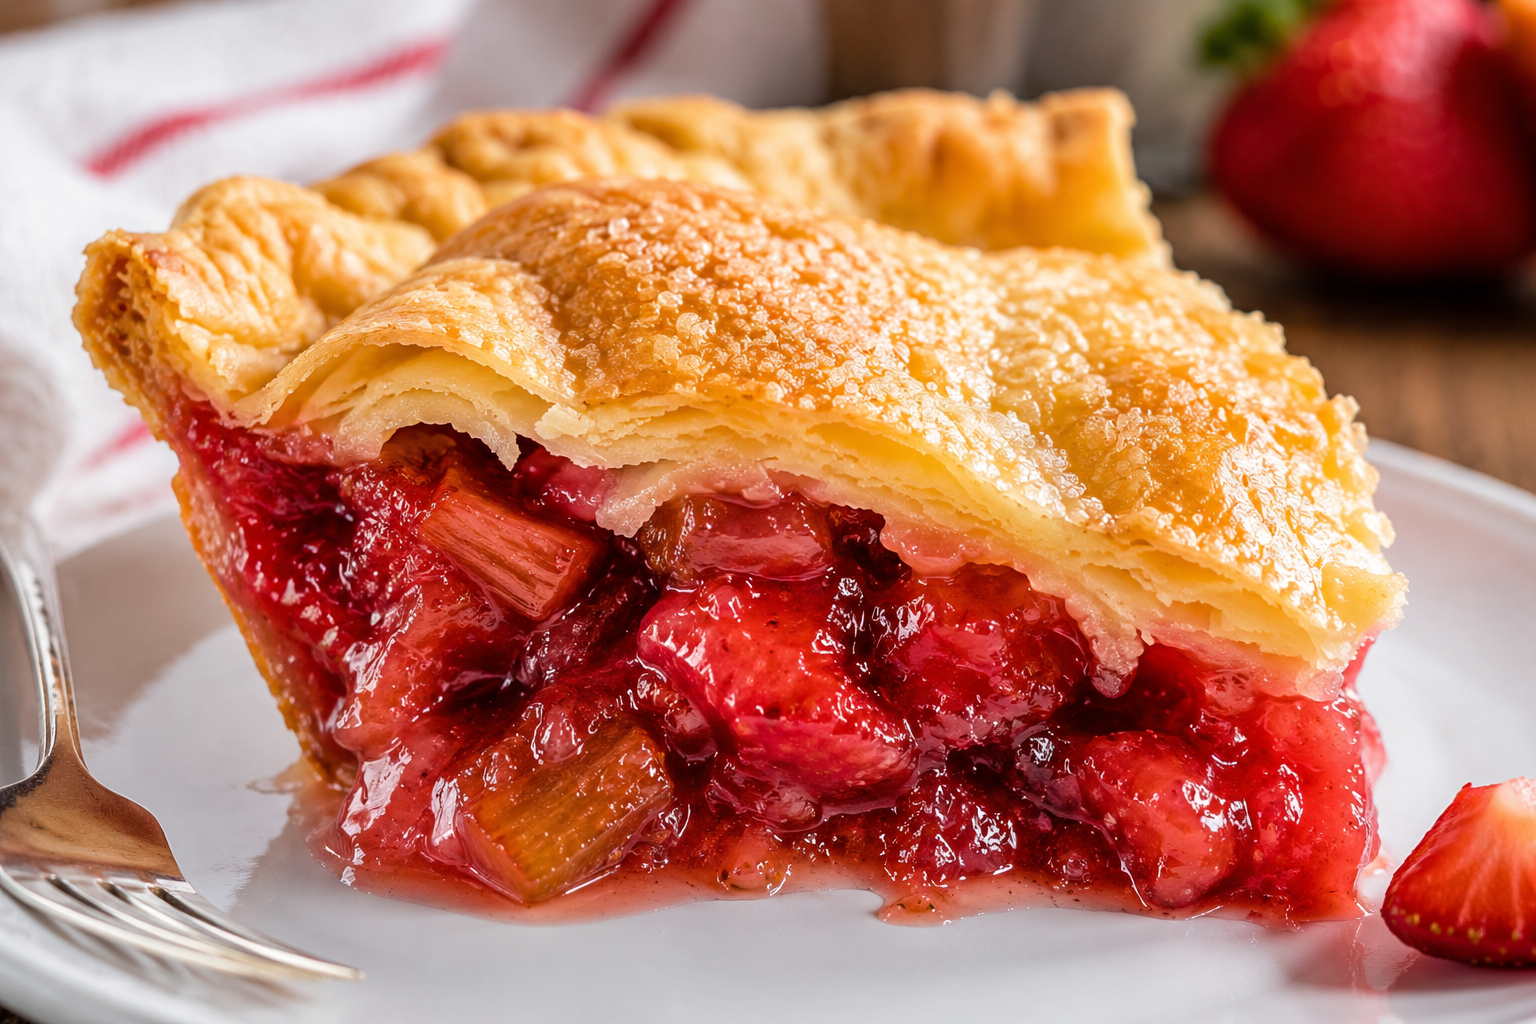
There is something timeless about a homemade strawberry rhubarb pie. It has that classic fruit-pie charm, but the flavor feels extra special because it balances juicy sweetness with a bright, tangy edge that keeps every bite interesting.
This recipe leans into that beautiful contrast. Fresh rhubarb brings the tartness, strawberries soften it with natural sweetness, and together they create the kind of filling that tastes like spring and early summer baked into one pie.
The texture is part of the magic too. You get a bubbling fruit center, a tender filling that sets as it cools, and a flaky double crust that makes the whole dessert feel cozy and classic.
It is also the kind of pie that feels right at home on a holiday table, at a weekend family dinner, or tucked into a casual summer gathering. It looks nostalgic, slices beautifully once cooled, and feels like the sort of dessert people always come back for. This occasion fit is an inference based on the pie’s format and serving style.
One especially helpful detail in the source recipe is the flour-and-sugar layer sprinkled into the bottom crust before the fruit goes in. That step is meant to help protect the crust from getting soggy, which is especially useful when baking with rhubarb because it releases a lot of moisture.
The baking method is practical too. The pie starts hot, then finishes at a lower temperature, which helps the crust get going while giving the filling time to fully cook and bubble.
And when you serve it with a scoop of vanilla ice cream, it turns into the kind of old-fashioned dessert that feels simple, generous, and completely worth the wait. The source specifically recommends vanilla ice cream as a serving option.
Quick Intro Summary
Classic fruit pie · Spring and summer dessert · Flaky, juicy, and perfectly sweet-tart.
Recipe Overview
- Prep Time: 20 minutes.
- Cook Time: 1 hour 15 minutes.
- Total Time: 1 hour 35 minutes.
- Servings: 10 slices.
- Calories: 258 per slice.
- Course: Dessert. This is based on the recipe card and pie format.
- Cuisine: American-style fruit pie. This is an inference based on the ingredients and baking style.
Why You’ll Love This Recipe
- The strawberry and rhubarb combination gives you a balanced filling that is both sweet and tart.
- The double crust makes it feel extra homey and classic.
- A simple flour-and-sugar trick helps protect the bottom crust from excess moisture.
- The filling uses fresh fruit and just a handful of pantry ingredients.
- It is a beautiful pie to serve with vanilla ice cream or all on its own.
Ingredients
For the pie crust
- 2 cups all-purpose flour.
- 2/3 cup plus 2 tablespoons shortening.
- 1 teaspoon salt.
- 6 tablespoons ice-cold water.
For the strawberry rhubarb filling
- 4 cups fresh rhubarb, cut into bite-size pieces.
- 2 cups fresh strawberries, cut up.
- 1 1/3 cups sugar.
- 7 tablespoons all-purpose flour.
For finishing
- A little milk, for brushing the top crust.
- White sugar, for sprinkling over the top.
How to Make It
- Make the crust dough.
Cut the shortening into the flour and salt until the mixture looks like fine crumbs. Add the ice-cold water and gently bring the dough together, handling it as little as possible. Divide it into two equal portions for the top and bottom crust. - Prepare the fruit filling.
Combine the chopped rhubarb and strawberries in a large bowl. In a separate bowl, mix the sugar and flour together. - Roll out the bottom crust.
Fit one piece of dough into a deep 9-inch pie plate. - Add the moisture-protecting layer.
Sprinkle 1/4 cup of the sugar-and-flour mixture into the bottom crust before adding the fruit. This helps reduce sogginess in the base. - Fill the pie.
Add the fruit to the crust, then sprinkle the remaining sugar-and-flour mixture over the top so it settles into the fruit. - Top and finish the crust.
Roll out the second piece of dough and lay it over the filling. Crimp the edges, cut steam vents in the top, brush with milk, and sprinkle with sugar. Set the pie on a foil-lined baking sheet to catch any bubbling juices. - Bake in two stages.
Bake at 425°F for 15 minutes, then reduce the heat to 325°F and continue baking for 1 hour. Check the pie around the 30-minute mark, and if the crust is browning too quickly, tent it loosely with foil. - Cool before slicing.
Let the pie cool for several hours so the filling can set. Serve once the center is no longer runny.
Recipe Notes and Tips
- Handle the pie dough as little as possible. The source specifically notes that overhandling makes crust tougher.
- Use ice-cold water in the dough. That is part of the original crust method and helps the dough come together properly.
- Sprinkle part of the sugar-and-flour mixture into the bottom crust before the fruit. The source calls this out as a great way to help prevent a soggy bottom.
- Bake the pie on a foil-lined sheet pan. The filling is expected to bubble, and the lined pan makes cleanup much easier.
- Do not rush the cooling time. The source warns that slicing too soon will leave you with a loose, lava-like filling.
Easy Variations
- Reduce the sugar slightly if you want a tarter pie. The recipe notes say you can drop it from 1 1/3 cups to 1 1/8 cups.
- Serve it warm with vanilla ice cream for a more classic dessert presentation.
- Use a decorative lattice or cutout top crust instead of a full vented crust. This is my own presentation suggestion based on the double-crust structure.
- Add a little coarse sugar on top for extra sparkle and crunch. This is a natural extension of the source’s sugar-sprinkled top.
What to Serve With It
This pie is wonderful with vanilla ice cream, which the source specifically recommends. It would also pair nicely with whipped cream or hot coffee, though those are my own serving suggestions rather than source instructions.
Storage and Reheating
The source emphasizes cooling the pie completely so the filling can set, but it does not provide a detailed leftover storage section. Based on the baked fruit filling and double crust, I would loosely cover leftovers and store them in the refrigerator for best freshness. That storage guidance is my own kitchen recommendation, not a source-provided instruction.
To reheat, warm slices gently in the oven so the crust stays crisper than it would in the microwave. This reheating tip is also my own recommendation.
FAQs
How do I keep the bottom crust from getting soggy?
Sprinkling part of the sugar-and-flour mixture directly into the bottom crust before adding the fruit is the source’s key tip for that.
Can I make this pie more tart than sweet?
Yes. The recipe notes say you can reduce the sugar from 1 1/3 cups to 1 1/8 cups.
Why does the pie need to cool so long?
The filling needs time to set. If you slice too early, it will be much looser and messier.
Why bake it at two temperatures?
The recipe starts at a hotter temperature for 15 minutes, then finishes lower for 1 hour. That two-stage bake helps the crust and filling cook properly.
What should I serve with strawberry rhubarb pie?
Vanilla ice cream is the classic pairing recommended in the source.
Best Strawberry Rhubarb Pie with Sweet Tart Homemade Filling
Ingredients
Method
- Make the crust dough.
- Cut the shortening into the flour and salt until the mixture looks like fine crumbs. Add the ice-cold water and gently bring the dough together, handling it as little as possible. Divide it into two equal portions for the top and bottom crust.
- Prepare the fruit filling.
- Combine the chopped rhubarb and strawberries in a large bowl. In a separate bowl, mix the sugar and flour together.
- Roll out the bottom crust.
- Fit one piece of dough into a deep 9-inch pie plate.
- Add the moisture-protecting layer.
- Sprinkle 1/4 cup of the sugar-and-flour mixture into the bottom crust before adding the fruit. This helps reduce sogginess in the base.
- Fill the pie.
- Add the fruit to the crust, then sprinkle the remaining sugar-and-flour mixture over the top so it settles into the fruit.
- Top and finish the crust.
- Roll out the second piece of dough and lay it over the filling. Crimp the edges, cut steam vents in the top, brush with milk, and sprinkle with sugar. Set the pie on a foil-lined baking sheet to catch any bubbling juices.
- Bake in two stages.
- Bake at 425°F for 15 minutes, then reduce the heat to 325°F and continue baking for 1 hour. Check the pie around the 30-minute mark, and if the crust is browning too quickly, tent it loosely with foil.
- Cool before slicing.
- Let the pie cool for several hours so the filling can set. Serve once the center is no longer runny
Notes
- Handle the pie dough as little as possible. The source specifically notes that overhandling makes crust tougher.
- Use ice-cold water in the dough. That is part of the original crust method and helps the dough come together properly.
- Sprinkle part of the sugar-and-flour mixture into the bottom crust before the fruit. The source calls this out as a great way to help prevent a soggy bottom.
- Bake the pie on a foil-lined sheet pan. The filling is expected to bubble, and the lined pan makes cleanup much easier.
- Do not rush the cooling time. The source warns that slicing too soon will leave you with a loose, lava-like filling.